In the Whimsical Wednesday posts, so far I’ve printed on baby and dog tee’s, tote bags, hats and even created my very own celebrity boyfriend!
Today I thought I’d try something a little different by printing on canvas. Now if you’ve ever gone searching for the perfect piece of art you know that canvas prints are not cheap. On the low end you might find one for about $60-80, but they are usually much more than that. Especially if the art is hand-painted.
Imagine if you could offer your customers their own customized canvas prints… oh the possibilities!
First things first, you’ll need a supplier for the canvas. For the purpose of this experiment, we purchased a thick mounted canvas and a package of smaller, thin mounted canvas sheets.
I’m still the new kid on the block so this print was tricky for me… One of the hardest things was making sure the canvas was perfectly centered for the image. There was no way to secure it to the platen so I had to be very careful not to move it once it was in place. Once the height was adjusted for the canvas, I printed on paper that I had taped to the platen to ensure proper placement of the image.
Disclaimer: When printing on something other than T shirts, make sure you adjust the print head laser height manually to avoid hitting the print head on the new material.
The first canvas print I did was a botched job… since I was printing on canvas and not T shirts I assumed no pretreat was needed. I was wrong. As you can see in this image, the ink was blotchy and blurred.
With round two I was a bit wiser. Using dark garment pretreat and a heat gun, my assistant and I pretreated two canvases; one thin board and the larger mounted canvas. After going over each canvas several times with the heat gun, I placed them on the heat press to dry completely.
Note: you do not want to close the heat press, just allow the canvas to sit on a sheet of curing paper with the heat press turned on for several minutes or until dry.
Now I was ready for my second attempt! As you can see, the pretreat made a huge difference in the quality of the print. The ink was smooth and the lines were clear…. until I overcooked it in the heat press. Botched job number two!
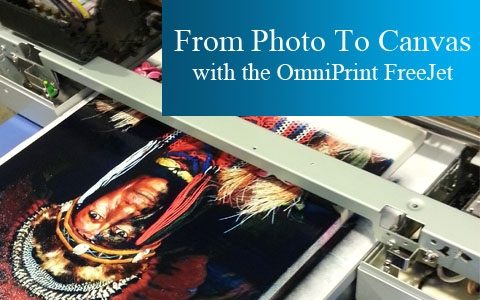
For the larger canvas print I used a detailed photograph of a Native American Chief. This was my last chance to get it right…
Since this canvas was mounted to a wood frame I did not need to use a platen. I had already pretreated the canvas earlier so I was ready to go. Once I made sure it was centered, I used the FreeJet 330TX to begin the print!
The image I wanted to use was slightly taller than the canvas, so I placed a layer of paper down under the canvas to avoid getting ink on the machine. The overall print result turned out beautifully!
Are canvas prints something you think your customers would be interested in? Have you tried printing on canvas yourself? Tell us about it in the comment section below!
Sincerely,
Danielle at OmniPrint International
